We would like to thank you for purchasing Costar Coronavirus WordPress Theme! We are very pleased you have chosen Costar WordPress Theme for your website, you will be never disappointed.
Before you get started, please be sure to always check out this documentation. We outline all kinds of good information and provide you with all the details you need to use Costar WordPress Theme. You need to have a server running WordPress then you are ready to go.
If you are unable to find your answer here in our documentation, we encourage you to contact us through our Support page. We are very happy to help you and you will get a reply from us ASAP. Thank you, we hope you to enjoy using Costar WordPress Theme!
To install this theme you must have the latest version of WordPress already installed. If you need help installing WordPress, follow the instructions in WordPress Codex. Below are all the useful links for WordPress information.

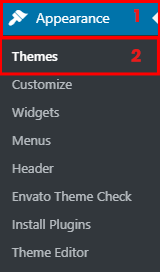
Step: 1. Open WordPress admin panel and go Appearance -> Theme page.
Step: 2. Click Add New button and click the Upload Theme button. Upload the costar.zip


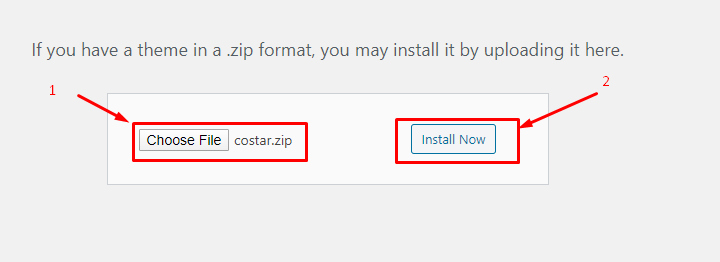
Step 3. Once the theme is done uploading you need to click the Install Now button.
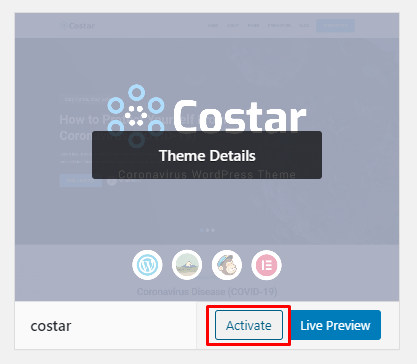
Step 4. Open WordPress admin panel and go Appearance -> Theme and activate the Costar WordPress theme.
After you Activate this theme you will see a message in the WordPress admin panel that you can install the recommended plugins. All plugins are free to use. You can install them all to get the best out of your theme. However, you can use the Costar WordPress Theme without installing any plugins too. In that case, some functionality will be limited.
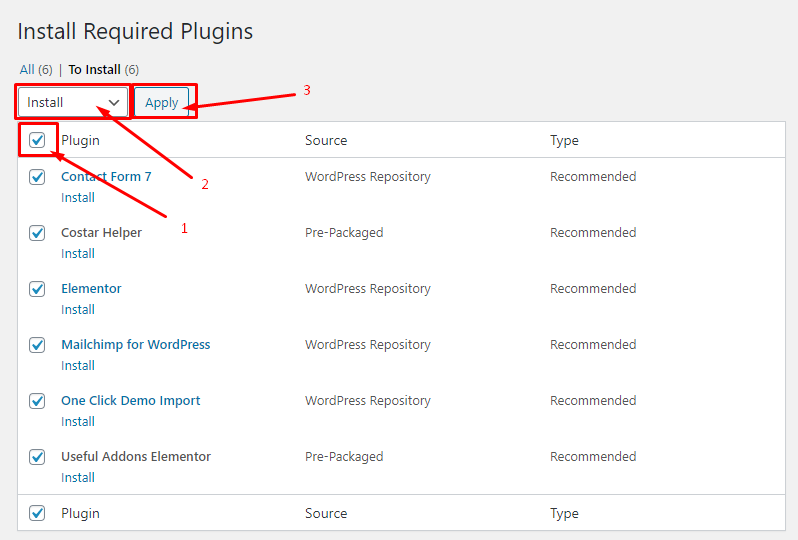
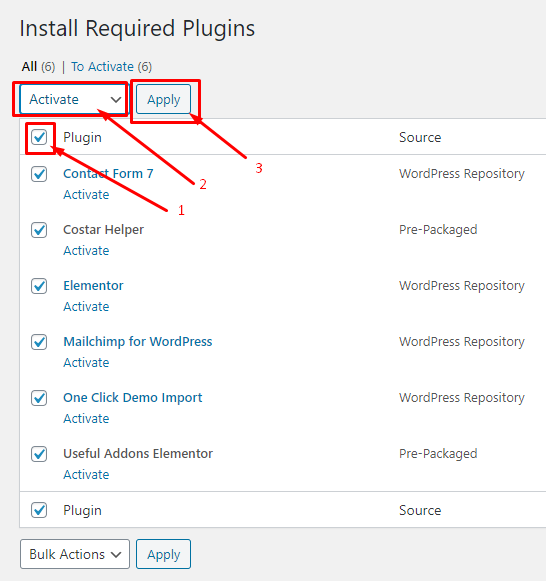
Step 1 - Click Begin Installing Plugins in the notice message
Step 2 - You can check all plugins (We recommend installing all plugins to get the best out of Costar. However, you can use the theme without any plugin.)
Step 3 - Select Install in dropdown Bulk Actions menu and click Apply
Step 4 - You should get All Installations have been Completed message with installed Plugins table below it
Step 5 - Select Activate in the dropdown menu under Bulk Actions and click Apply to activate the plugin(s)

Costar theme recommends the following plugins for best experience:
Recommended Plugins:
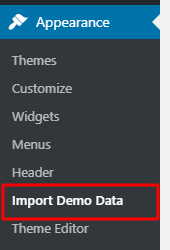
Step 1. Go to Appearance -> Import Demo Data on admin panel sidebar.
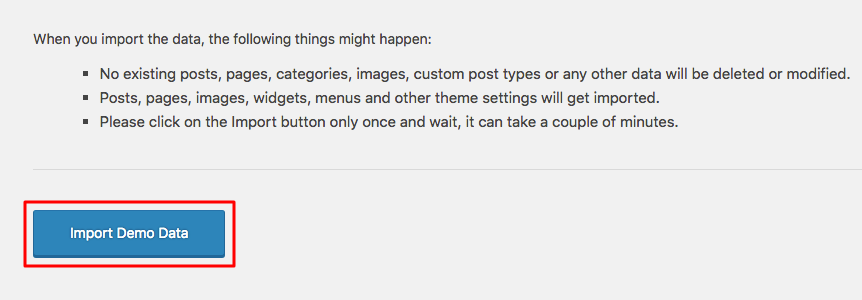
Step 2. Click the Import Demo Data button.
Step 3. After Imported Demo data. You will see a message That's it, all done!
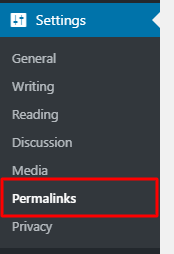
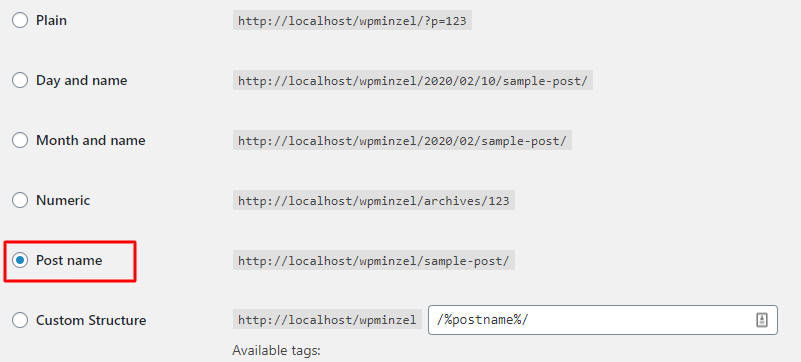
Step 4. Go to Setting -> Permalinks check Post Name.
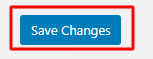
Step 5. Then Click the Save Changes button.

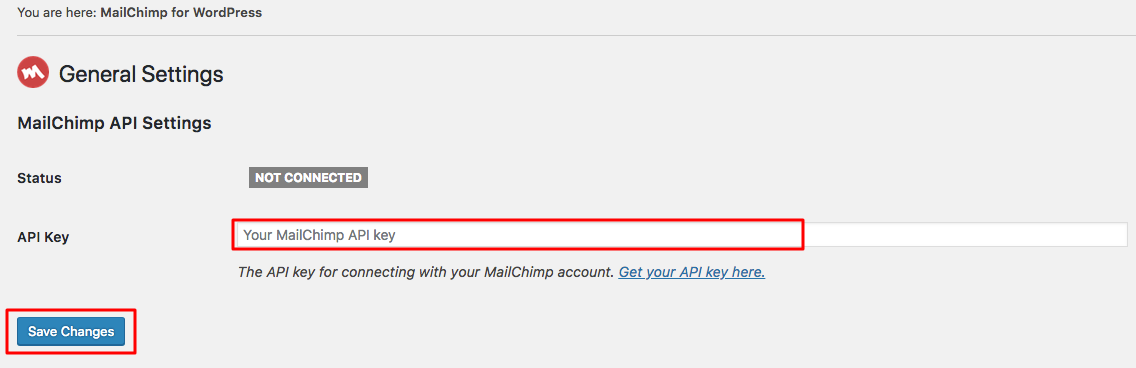
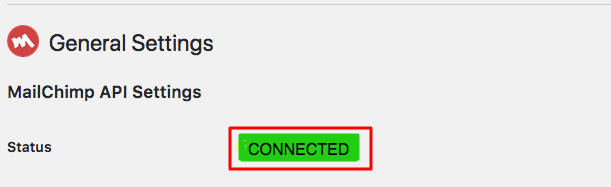
If you have installed mailchimp for WordPress plugin. So you need to connect it with mailchimp site.
Go to MailChimp for WP on WordPress admin sidebar. Enter you mailchimp api key. Then click the Save Changes button on the bottom. You will see a message CONNECTED.
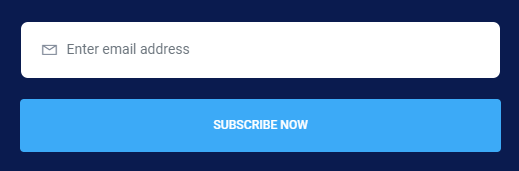
    <div class="subscriber-form">
        <div class="contact-form-action">

            <div class="form-group">
                <input class="form-control" type="email" name="email"
                placeholder="Enter email address">
                <span class="la la-envelope-o input-icon"></span>
            </div>
            <div class="btn-box">
                <button class="template-btn border-0 w-100" type="submit">Subscribe now</button>
            </div>

        </div>
    </div>
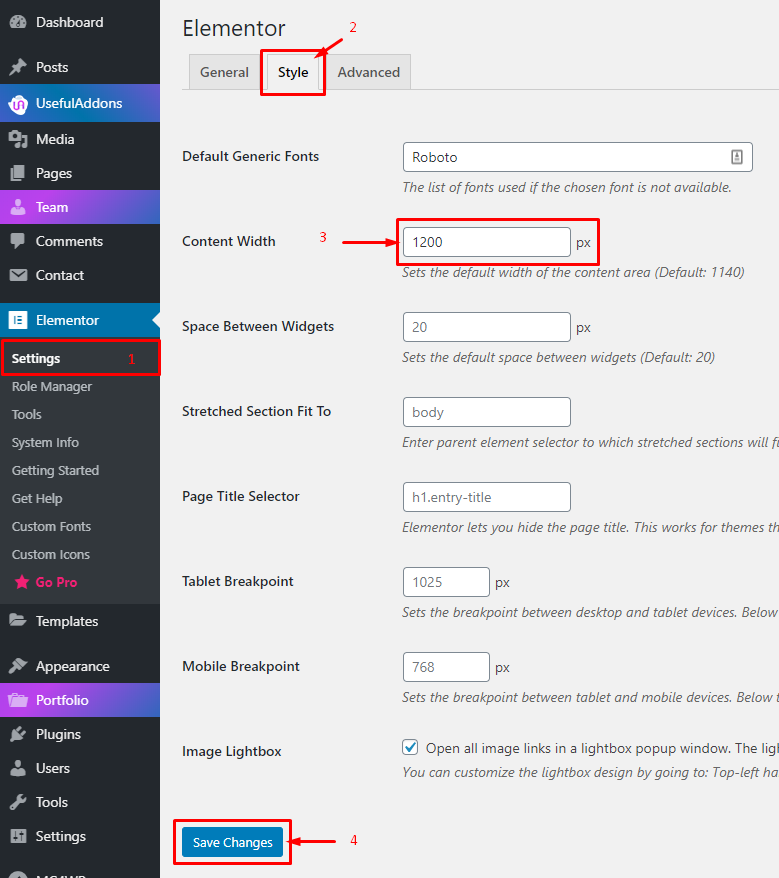
Note: You need to add elementor container width 1200. check the steps below
Step 1 Go to Elementor->Settings
Step 2 Then go to Style tab
Step 3 And then set the width 1200 on the Content Width field
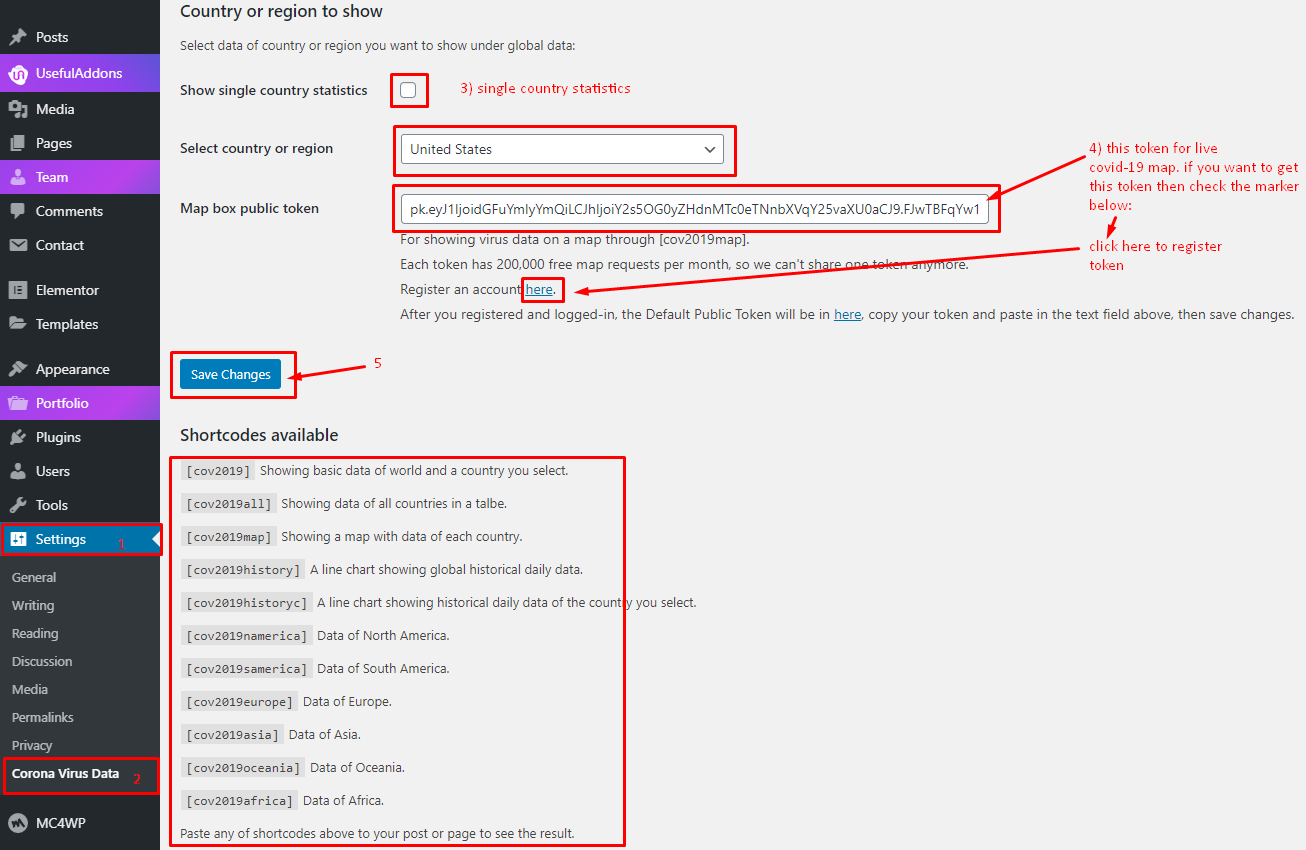
We have used corona virus live data. If you want to edit live data then check the steps below:
Step 1 Go to Settings -> Corona Virus Data
Step 2 Then scroll down the page, then you will be able to see Select country or region option. if you want to show single country's corona virus datas then select the country and check this box Show single country statistics
Step 3 and your all shortcodes at the bottom you can use those shortcodes
This method does require more steps and manual work. First you need to manually download the new theme package from your Themeforest account. Once you have the new theme package, you can choose to upload the theme via WordPress or via FTP. Please see the information below for how to download new files, and install it via WP or via FTP.
Step 1. Log into your Themeforest account and navigate to your downloads tab. Find the "Costar" theme purchase.
Step 2. Click the "download" button next to it and choose to download the "Installable WordPress Theme" which is just the WordPress file, or choose the "Main Files" which is the entire package that contains everything.
Step 3. Then you need to decide if you want to install the update via FTP or via WordPress. Directions for both methods are below.
Step 1. Go to "wp-content->themes location and backup your "Costar" theme folder by saving it to your computer, or you can choose to simply delete it. Your content will not be lost.
Step 2. Retrieve the "costar.zip" file from your new Themeforest download and extract the file to get the "costar" theme folder.
Step 3. Then simply drag and drop the new "costar" theme folder info "wp-content->themes" location. Choose to "Replace" the current one if you did not delete it.
Step 4. Lastly, update the included plugins. You will see a notification message letting you know the plugins have a new version and need to be updated. You should update the plugins. You can see Update Plugin
Step 1. you need to deactivate the current "Costar" theme in the "Appearance->themes" section by simply activating a different theme. Once you activate a different theme, you can delete the Costar theme. Don't worry, your content will not be lost.
Step 2. Retrieve the "costar.zip" file from your new Themeforest download. It you downloaded the "Main Files" from Themeforest, then you need to unzip the archive file you received, the "costar.zip" will be inside of it.
Step 3. Then simply upload the "costar.zip" file in the "Appearance->themes" section. Click on the "Install Themes" tab at the top and choose to upload the zip file.
Step 4. Once it uploads, choose to activate the theme.
Step 5. Lastly, update the included plugins. You will see a notification message letting you kno the plugins have a new version and need to be updated. You should update the plugins. You can see Update Plugin for more details.
Like WordPress itself, you can update plugins with a one click method. To do that, go to the 'Updates' section of your administration panel.
If there are some plugins that can be updated, they will appear here, right below the part which tells you if a new version of WordPress is available or not.
To update your plugins, select them and click on the 'Update Plugins' button .
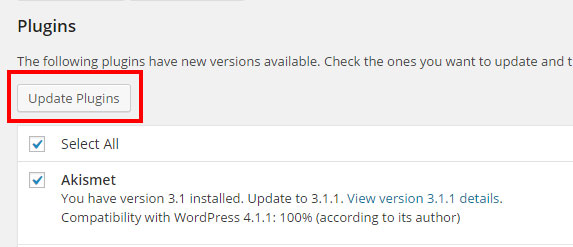
Whether for plugins, you will be led to another page which will inform you about the progress of the update, just as it does with the WordPress update.
Note that for plugins, another section will also allow you to update in one click: the "Installed Plugins" section in the Dashboard. If a plugin can be updated, a message will appear right below it, with a link to update it automatically. You can even select all of your plugins and choose "Update" in the drop down list to bulk update the ones that need it.
You can adjust WordPress settings as follows:
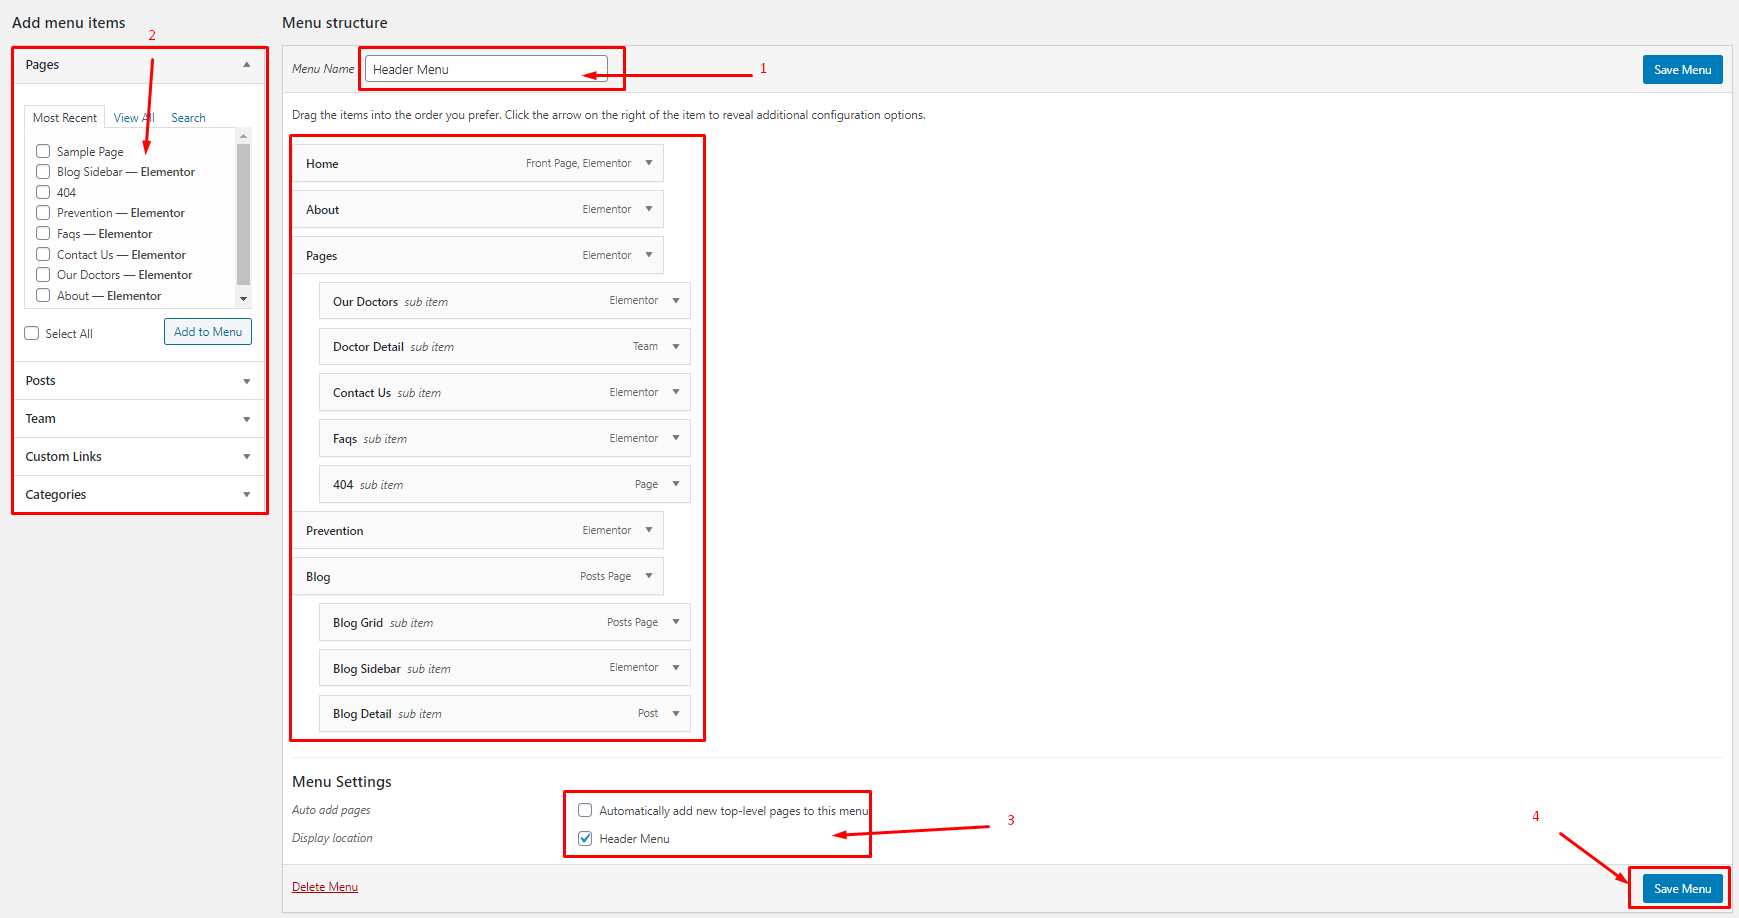
Costar Provides powerful add most advanced menu. There is 1 area of the theme you can assign a menu.
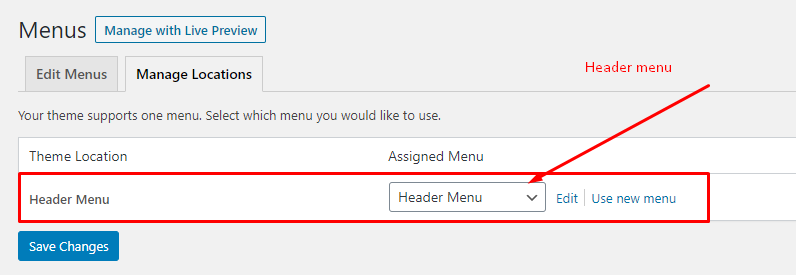

1. Please go to Appearance->Menus on admin sidebar.
2. Click Create a new menu or select a menu.
3. Add new menu item from pages.
4. You need to select the display menu location.
5. After edit the menu items, you should click Save Menu.
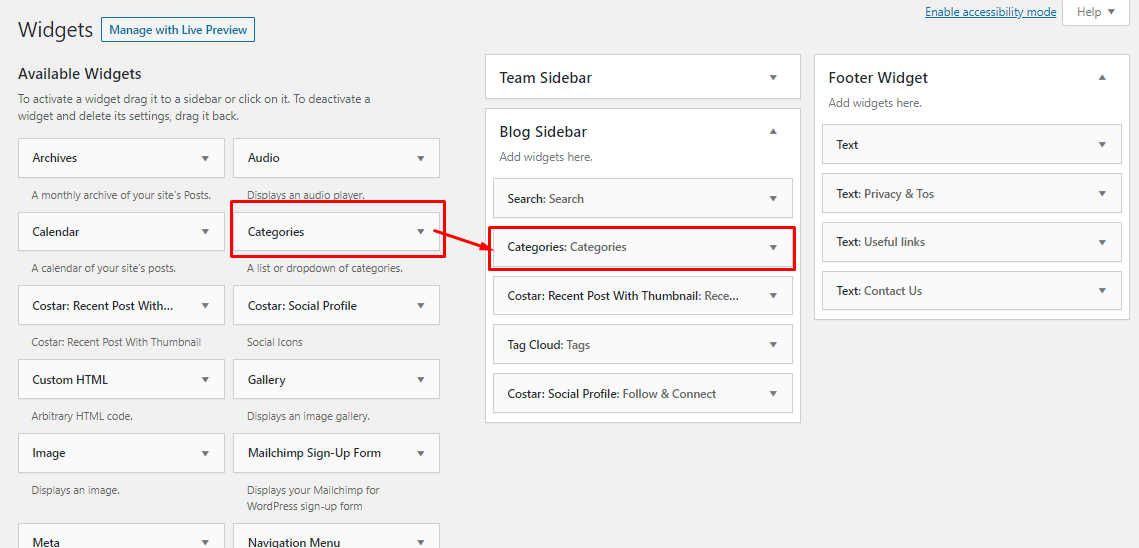
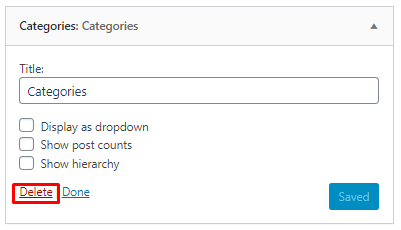
In Default, you can use widget in right sidebar and footer of a page.
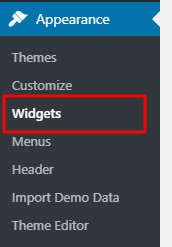
Step 1 - Go to Appearance -> Widgets.
Step 2 - Move widgets from left " Available Widgets " block to right sidebar that you want to use to add it to display in theme.
Step 3 - Press Delete to remove widget.
Costar is loaded with options for the box. It offers some different options for you to present your blog posts, along with several different blog layouts. The Costar blog is extremely versatile and powerful. There are nice ways to display your blog posts. The following sections will cover each of these aspects of the blog that are listed below.
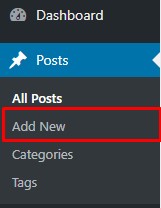
Step 1 - Navigate to Posts in your WordPress admin sidebar.
Step 2 - Click on the Add New option to make a new post. Create a title, and insert your post content in the editing field.
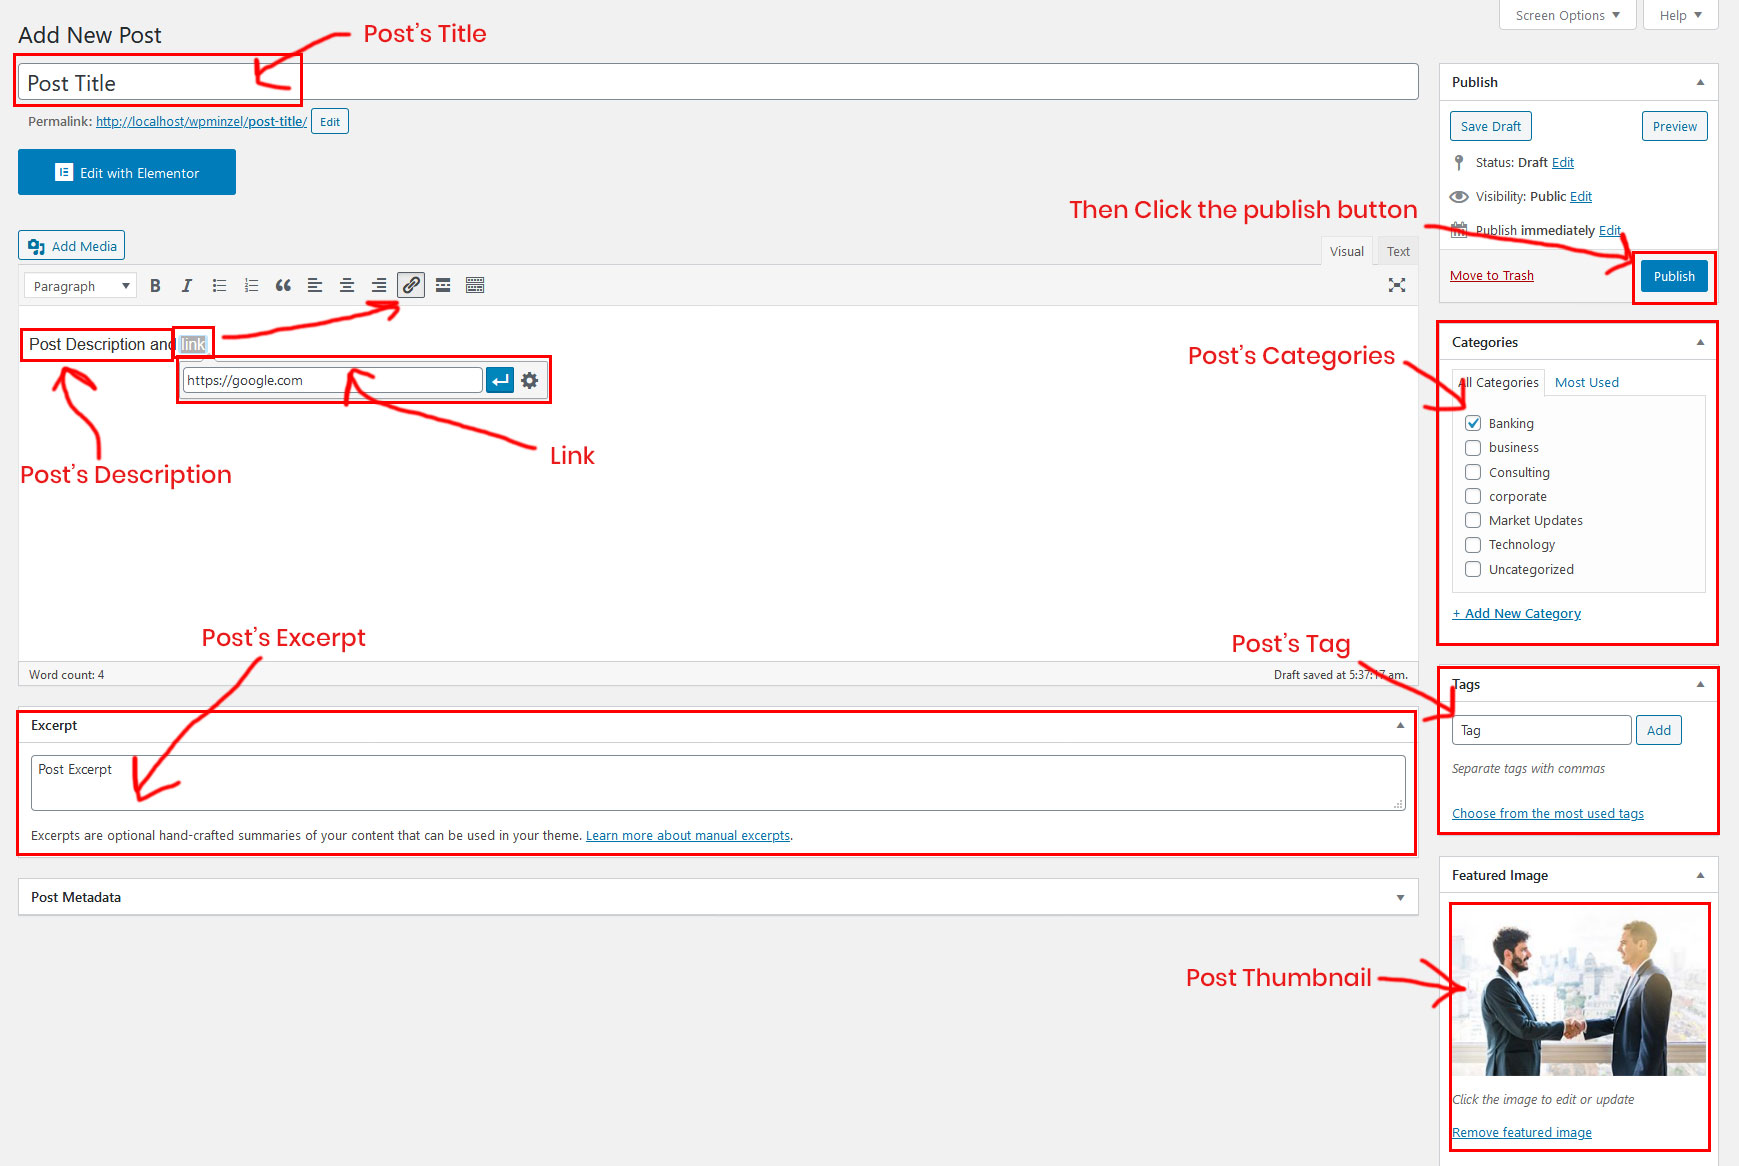
Step 3 - Add Categories from the right side. To assign it to the post, check the box next to the Category name.
Step 4 - Add tags from the right side. Type the name of the tag in the field, separate multiple tags with commas.
Step 5 - For a single image, click the first Featured Image Box, select an image and click the Set Featured Image button.
Step 6 - For a link post, paste the URL into the up editor Link field.
Step 7 - Once you are finished, click Publish or Update to save the post.
Here is a screenshot that shows the various areas of the post page described above.
We have included default code for costar contact form. You can use in this code click here.
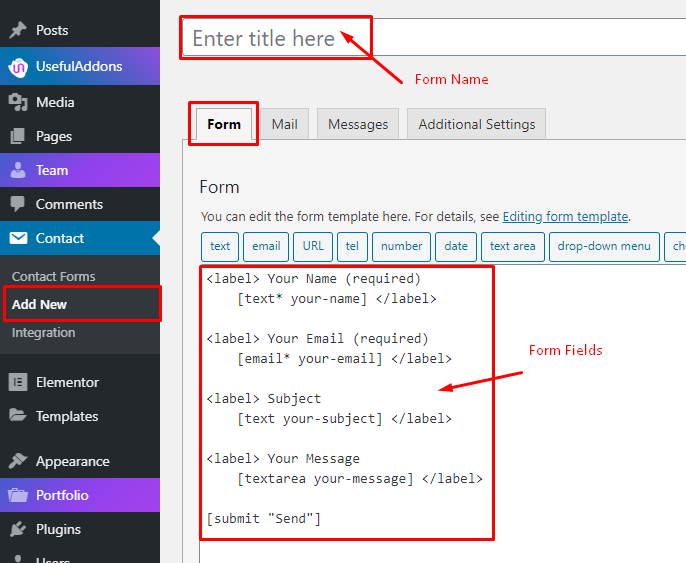
Step 1. If you have installed Contact Form 7 plugin from Appearance->Install Plugins on admin sidebar.
Step 2. Go to Contact->Add New on admin sidebar.
Step 3. Then click to Form tab in the contact form.
Step 4. Input content to create form. If you have created form then click the Save button on the bottom.
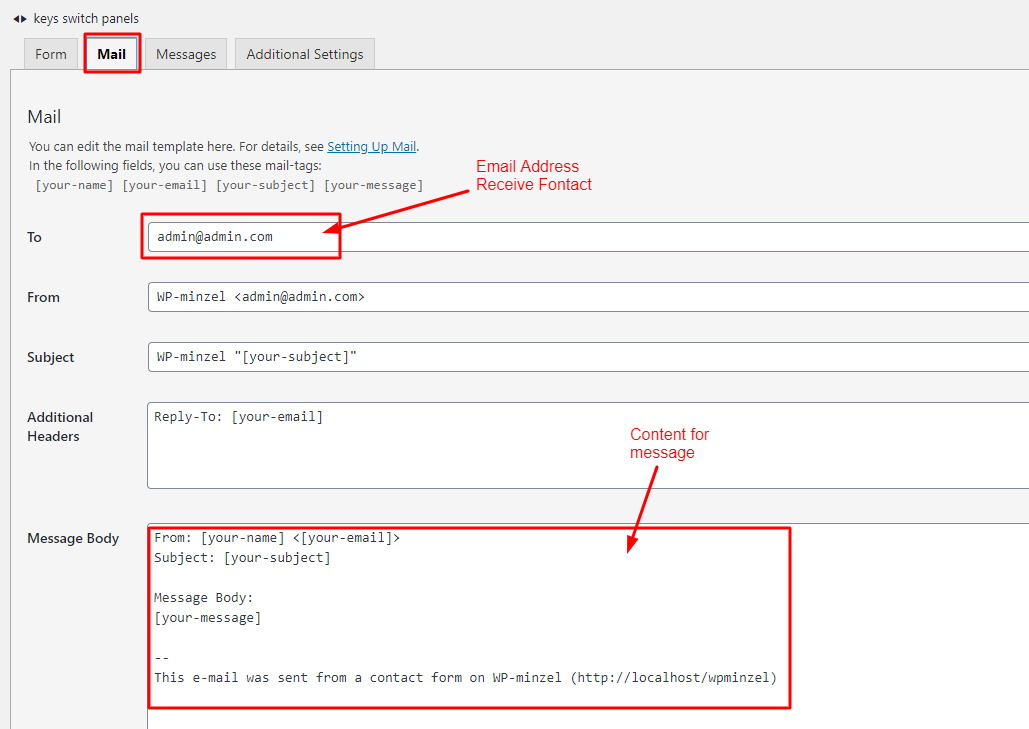
Step 5. If do you want to set your email on contact form, please go to Mail tab in contact form.
Step 6. And set your email address.
Step 7. After you have created form then click the Save button on the bottom.
That's it. Your contact form is ready
You can do step by step as image below to build contact form.
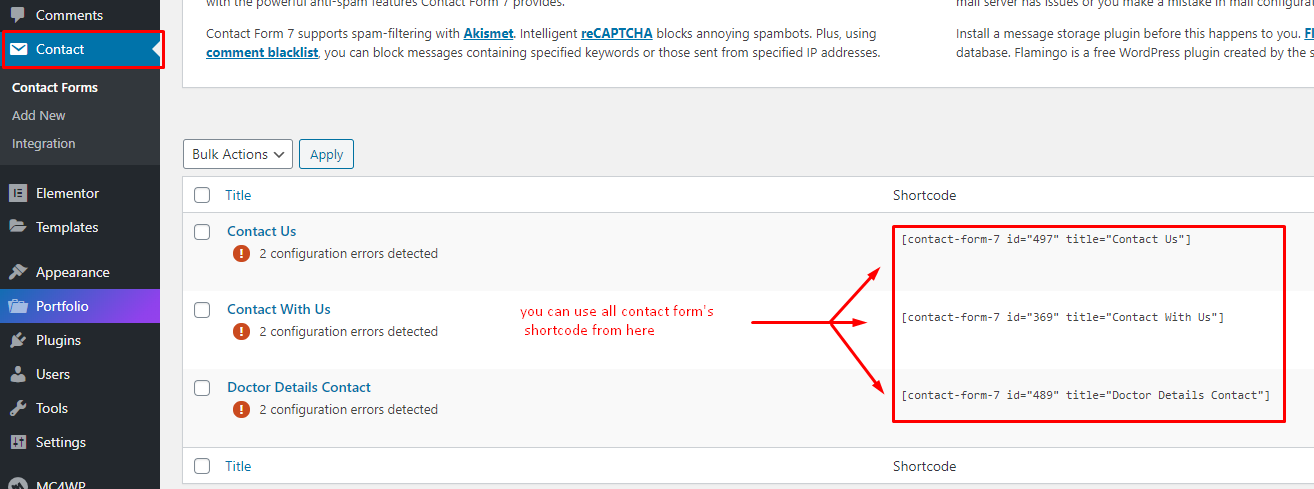
Step 1. Go to Contact on admin sidebar. And find which form you create and click Contact Form.
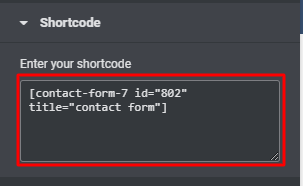
Step 2. Then you will be able to see shortcode at the top.
Step 3. Copy this shortcode.
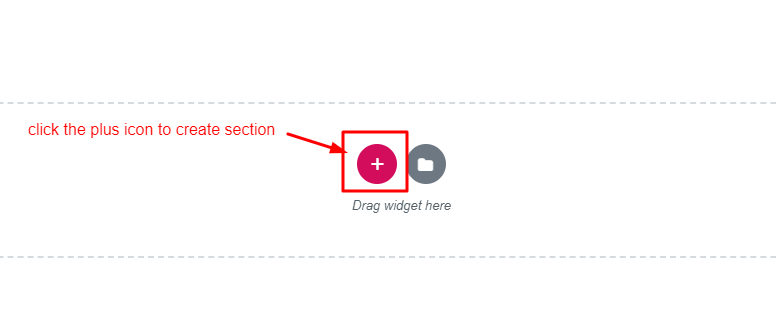
Step 4. Go to Page->Add New Enter the page title and click the Edit with Elementor button.
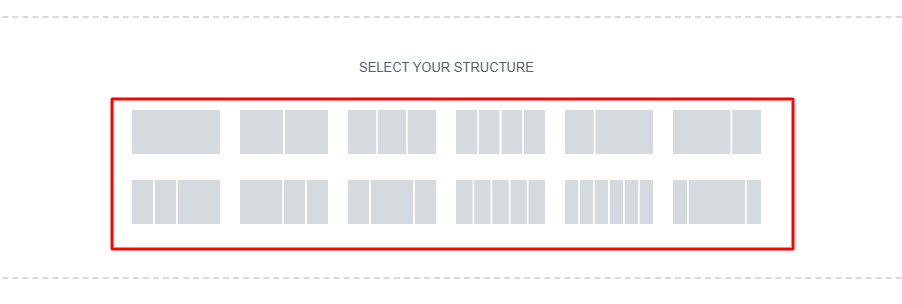
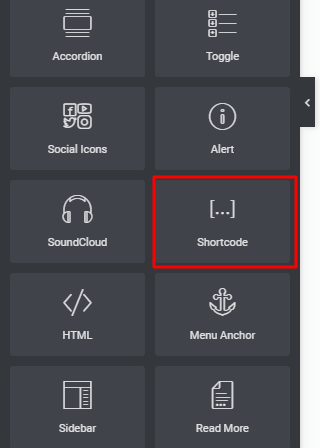
Step 5. And create an Elementor section. Then you will be able to see many addons in the left sidebar. so you need to find Shortcode addon and simply this addon. Then paste your contact form shortcode there.
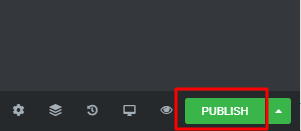
Step 6. Click the Publish button on the Left sidebar bottom.

You can visit Contact Form 7 Plugin to further details.
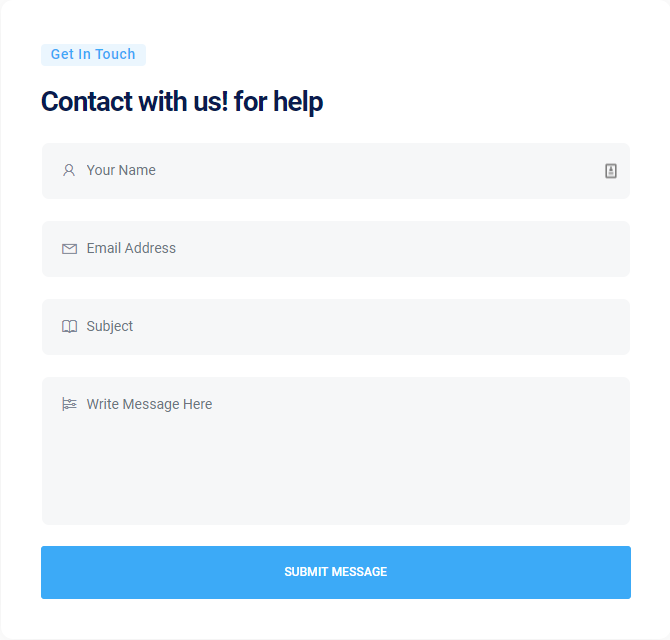
Or copy and paste content to Form field like this:
Example: Value Content for Contact Form.
<div class="user-form-wrap">
    <div class="user-form">
        <div class="section-heading">
            <h5 class="section__meta">get in touch</h5>
            <h2 class="section__title font-size-28">Contact with us! for help</h2>
        </div>
        <div class="contact-form-action mt-4">
            <form class="contact-form" method="POST" name="contactform" action="">
                <div class="input-box">
                    <div class="form-group">
                    [text text-468 class:form-control placeholder "Your Name"]<span class="la la-user input-icon"></span>
                    </div>
                </div>
                <div class="input-box">
                    <div class="form-group">
                    [email email-574 class:form-control placeholder "Email Address"]<span class="la la-envelope-o input-icon"></span>
                    </div>
                </div>
                <div class="input-box">
                    <div class="form-group">
                    [text subject-468 class:form-control placeholder "Subject"]<span class="la la-book input-icon"></span>
                    </div>
                </div>
                <div class="input-box">
                    <div class="form-group">
                    [textarea textarea-588 class:message-control class:form-control placeholder "Write Message Here"]<span class="la la-pencil input-icon"></span>
                    </div>
                </div>
                <div class="btn-box">
                    <div class="form-group text-center mb-0">
                    [submit class:template-btn class:border-0 class:w-100 "Submit message"]
                    </div>
                </div>
            </form>
        </div>
    </div>
</div>
You can manage multiple theme settings with live preview in our Customizer setting.
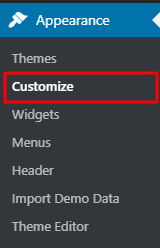
1 - Go to Appearance -> Customizer From the left sidebar in WP admin panel
You can manage a lot of panels, sections, settings check all available Tab with settings.
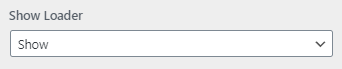
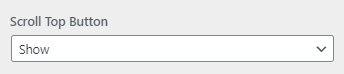
When you change the value of one setting, the result'll appear without saving. You can test before saving by click to Save button.
1 - Change general options like: Enable/Disable Page Loader Animation.
2 - Change general options like: Enable/Disable Scroll Top Button
and more...
We would like to thank you for using Costar Coronavirus WordPress Theme! We are very pleased you have chosen Costar Coronavirus WordPress Theme for your website, we always provide best support for our customers, you can confirm it from our themeforest review rating - top 1 in themeforest!
If you have any difficulties with Costar Coronavirus WordPress Theme or need any additional service, do not hesitate to contact us. We provide 24/7 Support!
Regarding presale questions and free support for theme usage, please contact us through themeforest support page. We will provide you amazing one-by-one email support and you will get answers more faster than you expected. We also provide support in weekends, but may require some more hours than normal working days.
Regarding customization service based on out themes or other magento related, please contact us to contact@techydevs.com. We have an amazing team to provide customization service who have done bunch of customization projects so far, will provide you reasonable quote before start.